Hello Guys, We will start a journey to build Magento 2 NextJs Theme in this blog.
Combining Magento 2 with Nextjs makes you one of the most powerful e-commerce platforms, so we will guide you through this blog step-by-step to the NextJS theme within the Magento 2 GraphQL API.
You should also check the Nextjs development services to aid your developmental progress.
Magento 2 Graphql API Overview
Magento 2 is a popular open-source e-commerce platform, that introduced GraphQl API support for client-side technology like ReactJs and NextJs. So We will work on the GraphQl API endpoints for the NextJS theme.
GraphQL is a query language for APIs that provides the power to ask for exactly what they need and nothing more.
To access the GraphQL endpoints provided by Magento 2, simply enter the URL http://<magento2-server>/graphql in the Chrome browser’s address bar.
Creating the NextJs project using Magneto 2.
Step 1: Project Setup — In this first step, we need to set up the NextJs project. You can follow this setup nextjs project blog.
For CSS UI, you can use the Tailwind CSS dependencies for a good Experience within the NextJs Project.
Step 2: Set up the Apollo client- We will need Apollo client dependencies that help you with both Apollo Client and GraphQl API.
Basically, Apollo Client is a state management library for use to fetch, cache, and modify application data.
Step 3: Global Variable Setup — We’re going to create a file named .env in the root directory and add the following code.
MAGENTO_ENDPOINT=http://<magento2-server>/graphqlStep 4: Export Global Variable — We need to define the global variable in the next.config.js file. otherwise, you can not use this variable at the front end. So write the following code.
//------------next.config.js-----------// /** @type {import('next').NextConfig} */ const nextConfig = { env: { MAGENTO_ENDPOINT: process.env.MAGENTO_ENDPOINT, }, reactStrictMode: true, }; module.exports = nextConfig;Step 5: Create the GraphQl File — We are going to create the GraphQl Query file name product.graphql in components/graphql/product.graphql and the following code. this file will help to fetch data API response.
//-------------components/graphql/product.graphql-------------// query ProductQuery($filters: ProductAttributeFilterInput) { products(filter: $filters) { items { id name sku description{ html } short_description{ html } image { disabled label position url } rating_summary media_gallery{ url position label disabled } } } }Step 6: Create a Route file to Display the Product — We’re going to create a file named [urlKey].js in pages/product/[urlKey].js.
In this blog, We are using this SSG feature. SSG means Static Site Generation (SSG) is a powerful feature in NextJs. that generates the HTML page at a build time web application This HTML page will then be reused on each request.
GetStaticPaths is an async function which is used to get the paths we want to pre-render based on products
import PRODUCT_QUERY from '../../components/graphql/Product.graphql'; export async function getStaticPaths() { let paths = []; const { data } = await client.query({ query: PRODUCT_QUERY, variables: { filters: {}, pageSize: 12 }, }); const products = data?.products?.items || []; paths = products.map((product) => ({ params: { urlKey: product?.url_key || '404' }, })); return { paths, fallback: 'blocking' }; }GetStaticProp is also an async function that generates data at the build time of generated path by the getStaticPaths function.
export async function getStaticProps({ params }) { const { data } = await client.query({ query: PRODUCT_QUERY, variables: { filters: { url_key: { eq: params?.urlKey } } }, }); const product = data?.products?.items?.[0] || null; if (!isValidObject(product) || !product.sku) { return { notFound: true, }; } return { props: { product: product, }, revalidate: 100, }; }GraphQl API response

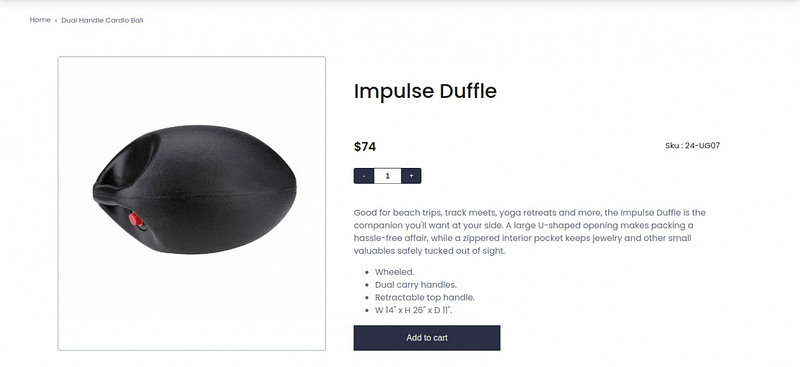
Final Code and UI Design According to the API Response.
//---------------pages/product/[urlkey].js-----------// import Image from 'next/image'; import { useState } from 'react'; import PRODUCT_QUERY from '../../components/graphql/Product.graphql'; const Product = ({ product }) => { const { thumbnail, price_range, sku } = product; const [addtocart, setAddtocart] = useState(1); const add = () => { setAddtocart(addtocart + 1); }; const sub = () => { addtocart > 1 && setAddtocart(addtocart - 1); }; return ( <div class="grid grid-cols-5 gap-4 w-[85%] mx-auto my-5"> <div className="col-span-2 border border-1 border-solid border-slate-400 rounded"> <Image src={thumbnail?.id} width={500} height={500} /> </div> <div className="col-span-3 mx-10"> <div className=""> <div display="grid"> <p className="font-[500] text-[2.5rem]">{product.name || ''}</p> <div className="flex justify-between "> <p className="text-price" sx={{ paddingTop: 1.5 }}> <span className="font-semibold"> $ {price_range?.minimum_price?.regular_price?.value} </span> <s className="pl-4 italic font-light text-fadedText"> {price_range?.discount?.amount_off} </s> </p> <p variant="body1" className="mt-7"> Sku : {sku} </p> </div> <div className="flex"> <button onClick={sub} aria-label="increment" className="text-white w-10 rounded-l h-8 border-0 cursor-pointer bg-secondary hover:bg-brand hover:contrast-75" > - </button> <input max={6} type="text" className="relative w-14 border-[1px] border-gray flex items-center px-3 font-semibold text-center text-gray-700 outline-none cursor-default -z-10 readonly focus:outline-none text-md hover:text-black focus:text-black md:text-base" min={1} value={addtocart} id="quantity" placeholder="0" /> <button aria-label="increment" className="text-white w-10 h-8 rounded-r border-0 cursor-pointer bg-secondary hover:bg-brand hover:contrast-75" onClick={add} > + </button> </div> <p className="pt-3 text-hoverEffect text-[16px] "> {product.short_description?.html || ''} </p> </div> <button color="secondary" variant="contained" className="w-full py-4 mx-auto" type="submit" > Add to cart </button> </div> </div> </div> ); }; export default Product; export async function getStaticPaths() { let paths = []; const { data } = await client.query({ query: PRODUCT_QUERY, variables: { filters: {}, pageSize: 12 }, }); const products = data?.products?.items || []; paths = products.map((product) => ({ params: { urlKey: product?.url_key || '404' }, })); return { paths, fallback: 'blocking' }; } export async function getStaticProps({ params }) { const { data } = await client.query({ query: PRODUCT_QUERY, variables: { filters: { url_key: { eq: params?.urlKey } } }, }); const product = data?.products?.items?.[0] || null; if (!isValidObject(product) || !product.sku) { return { notFound: true, }; } return { props: { product: product, }, revalidate: 100, }; }You can see the result on http://localhost:3000
Start your Magento 2 Headless Development with Webkul.
Happy Coding!!
View More
Originally published at https://webkul.com on September 28, 2023
Comments
Post a Comment