Introduction
Magento 2 Warehouse Management System Mobile App provides the mobile app to the warehouse staff to manage the orders that arrived for delivery at the warehouse.
It is a Magento 2 Inventory Management software app that helps the admin to manage the warehouse very easily. Also, it allows the admin to manage the product assigned in the sources warehouse.
For each source in the Magento MSI feature, a warehouse can be assigned. Also, the admin can define its structure (number of rows, columns, Shelves Per Cluster, and racks per shelf). The Admin has the feature to assign the product to the racks available in the warehouse.
The admin can assign the products of an order to the different warehouses and their staff. The staff of the warehouse can easily manage the orders assigned to them by the admin through the WMS app.
Likewise, Magento 2 Inventory Management software, the admin can even create multiple warehouses for this mobile app.
Moreover, the app follows the latest technology of Flutter wherein one can use Dart to build mobile apps.
Note- Magento 2 Inventory Management software is compatible with Magento version 2.3.x, 2.4.x
Check how the RF Gun can be used for inventory update and packing via the Magento 2 WMS mobile app.
Check the backend configuration -
Check the mobile app workflow for the staff/agents of the respective warehouse -
- Multiple warehouse creation from the back-end.
- The admin can assign a source to the warehouse.
- Products of the source are automatically assigned to the warehouse.
- Easily create warehouse structure (number of rows, columns, Shelves Per Cluster and racks per shelves).
- Multiple positions of a single product in the warehouse.
- Multiple staff for the warehouse can be created by the admin.
- The agents can download the app from the Google play store or apple store.
- Warehouse selection for assigning the order.
- Assign the ordered products to the staff in the warehouse.
- The staff receives a push notification every time an order is assigned.
- Agents can see the assigned orders under the order list in the WMS app.
- Agents can see the position of the assigned ordered products.
- The barcode of the tote can be generated by the admin from the back-end.
- The admin can print the barcodes of the products.
- The admin can choose the attribute for product barcode creation.
- The staff can scan the barcode of the order to add the tote.
- Verification of the tote is done by the staff.
Installation
For installing Magento 2 Warehouse Management System for Magento 2 (Adobe Commerce), follow the steps mentioned below:
Step 1: The customers will get a zip folder and they have to extract the contents of this zip folder on their system.
Now, move the “ app “ folder (inside “src” folder) into the Magento root directory on the server.

Step 2: Hereafter, run the below-mentioned commands in the Magento 2 root directory via the terminal.
php bin/magento setup:upgrade
php bin/magento setup:di:compile
php bin/magento setup:static-content:deploy
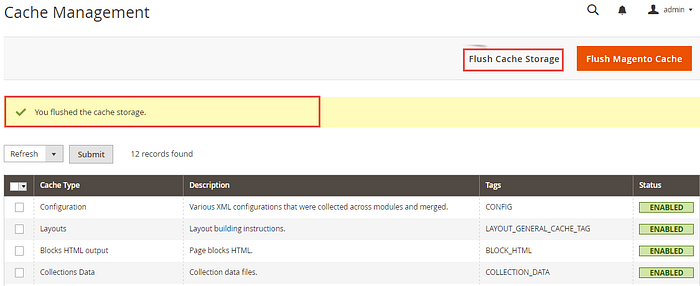
After the above steps, flush the cache and re-index all by navigating through System-> Cache Management.
WMS Configuration
After the successful installation of the module, the admin can navigate towards Stores > Configuration > Warehouse Management System to set the basic configuration of the module as per below image:
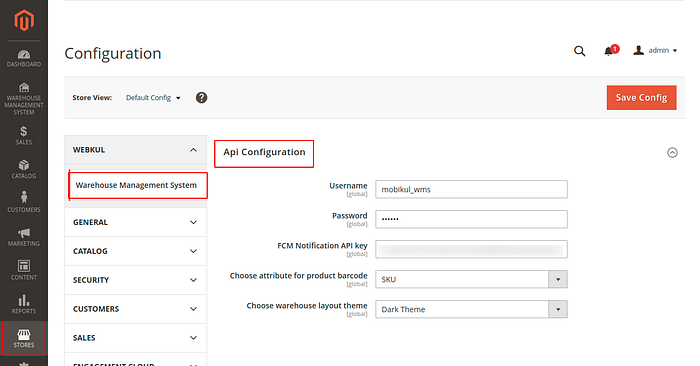
Username: The admin needs to enter the username of WMS APIs.
Password: Enter the password for WMS APIs.
FCM Notification API Key: Enter the server key of your Firebase account. Check this article to know how you can generate FCM server key.
Choose attribute for product barcode- Here the admin can choose the attribute for the barcode generation of the products.
Choose warehouse layout theme- From here the admin can choose the layout theme as Light or Dark.
Now, the API configuration completes.
Warehouse Management
The admin can navigate towards the Warehouse Management System > Manage Warehouse to manage the existing warehouses and for create the new warehouse.
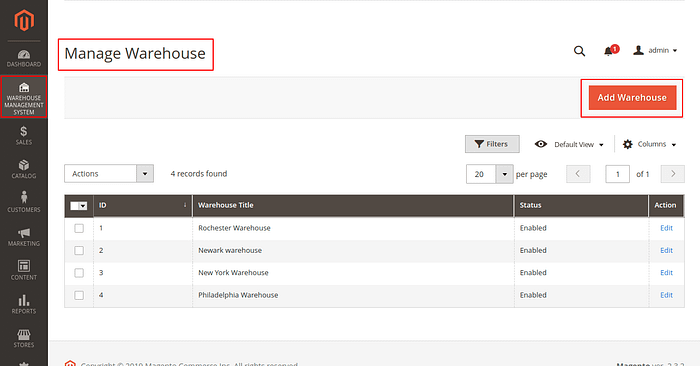
Apart from that, admin can Enable, Disable, or Delete and also can edit the existing warehouse.
For the creation of the new warehouse, the admin needs to click on the Add Warehouse button.
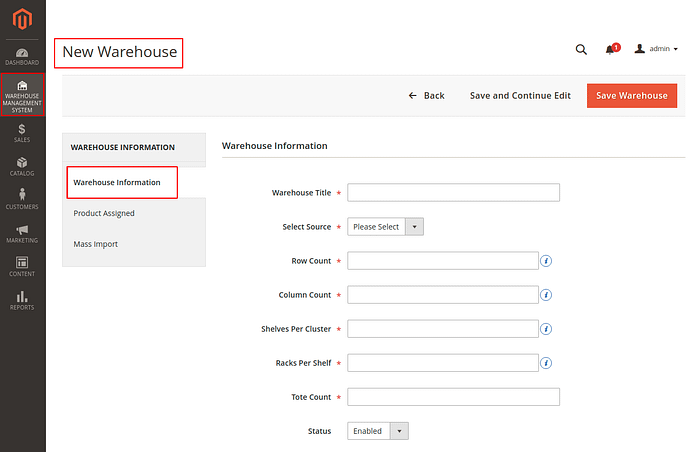
After that, the admin can create a new warehouse by entering some required fields to create the warehouse as per the below image:
1- Warehouse Information:
The admin needs to enter the Warehouse Information such as;
Warehouse Title — Here the admin can enter the name of the particular warehouse.
Select Source — The admin can select the source which they want to assign to the warehouse.
Row Count — Here the admin has to enter the number of rows present in the warehouse.
Column Count- The total count of the columns in the warehouse can be entered by the admin here.
Shelves Per Cluster — The admin has to enter the number of shelves present in the cluster.
Racks Per Shelf — Here the admin has to enter the number of racks present on each shelf.
Tote Count — The total number of the tote present in the warehouse can be entered here.
Status — The status of the warehouse is decided by the admin from here as enabled or disabled.
To know what rows, columns, shelves, clusters, and racks the admin can click on the ‘i’ button and see the image explaining the structure like this:
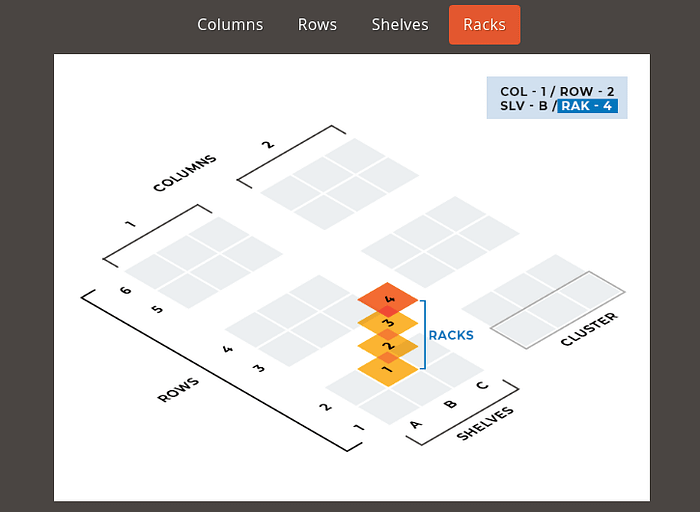
Please note:- After saving the warehouse the fields defining the warehouse structure are greyed out.
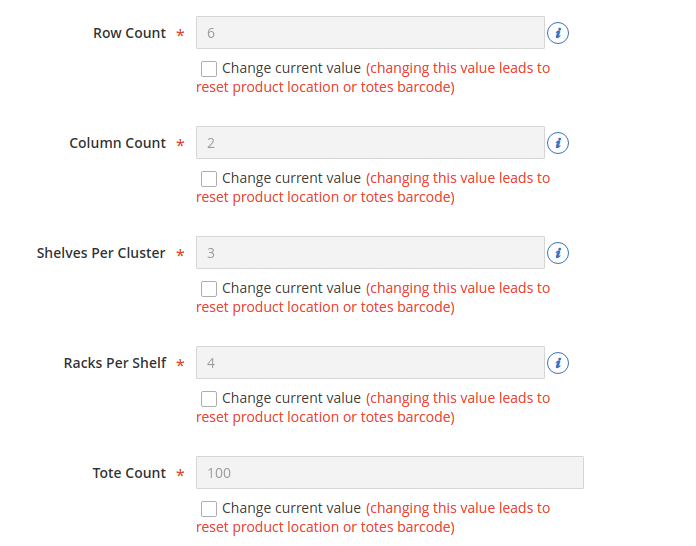
** Note- changing the value of Row Count, Column Count, Shelves Per Cluster, Racks Per Shelf, and Tote Count leads to reset product location or totes barcode.
2- Product Assignment:
After setting all the warehouse information of the warehouse, the admin needs to assign the products to the warehouse.
For that, refer to the below image:
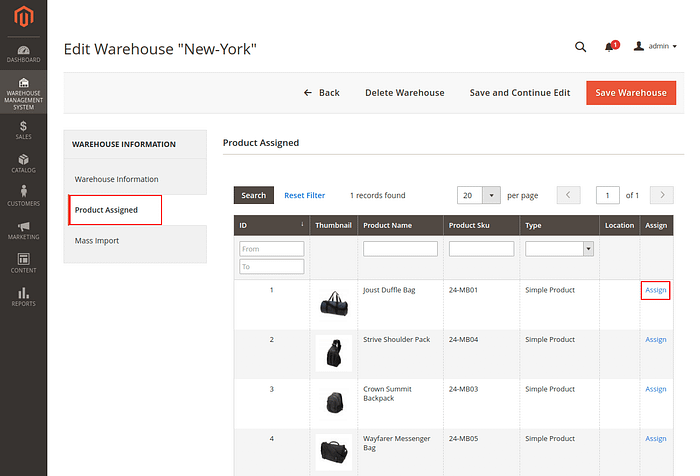
When the admin clicks on the Product Assigned button, the product list will appear to the admin.
The admin will choose the product which they want to assign to the warehouse by clicking on the Assign button.
When the admin clicks on the Assign button, they need to select the location for that particular product in the warehouse as per below image:
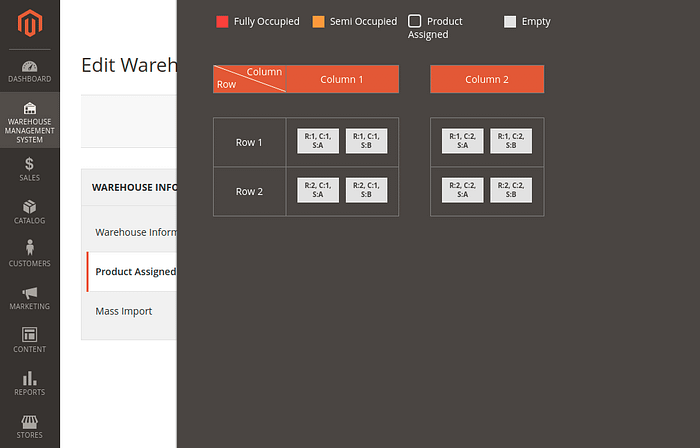
Once the admin will decide the Row, Column, and the shelf for the product, they need to assign the product to the particular Rack as per below image:
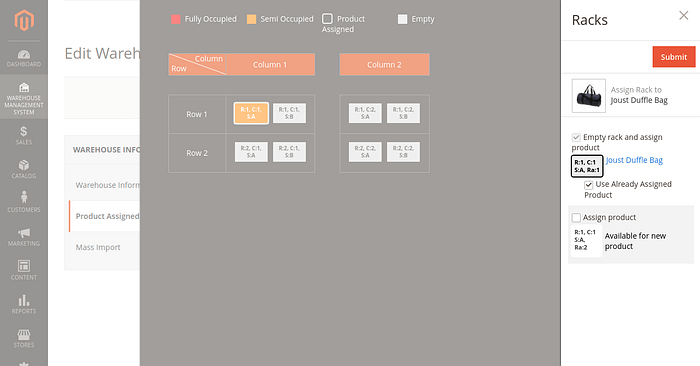
** The admin can assign multiple positions to a single product in the warehouse.
3- Mass Import:
The admin can also Mass Import and update products’ location in the warehouse. Under the mass import tab. For the reference check the below image:
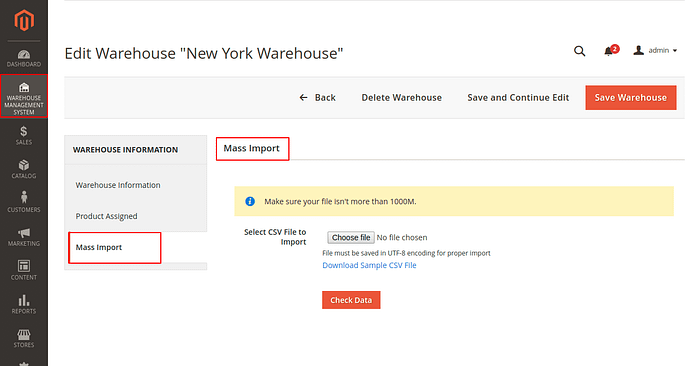
The admin can download the sample of the CSV file and update the product id as the sample file will contain all the combinations of locations. The admin you just need to enter the product ID.
See the below image for the sample of the CSV file:
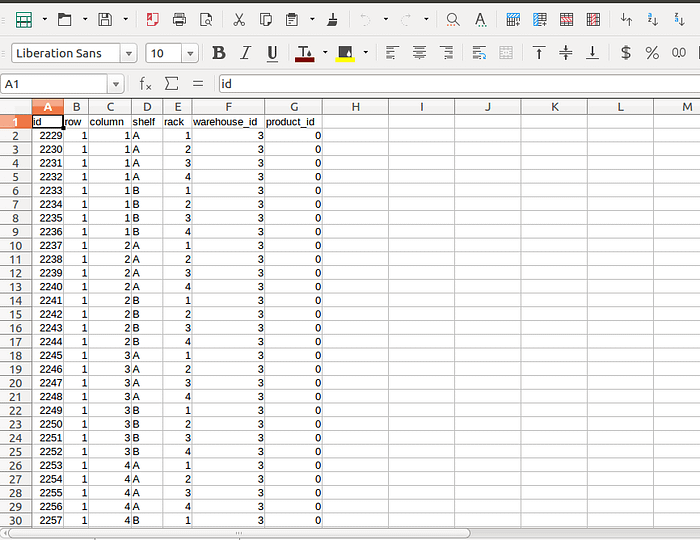
After updating the CSV file, the admin can upload it and check the data.
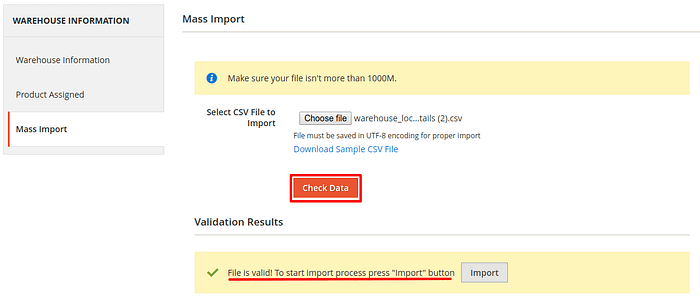
Now admin can click on the import button to import the location of products.
Thus, in this way, the admin can manage the warehouse.
Staff Management
The admin has to navigate towards the Warehouse Management System > Manage staff to manage the existing staff/agents and for creating the new staffs.
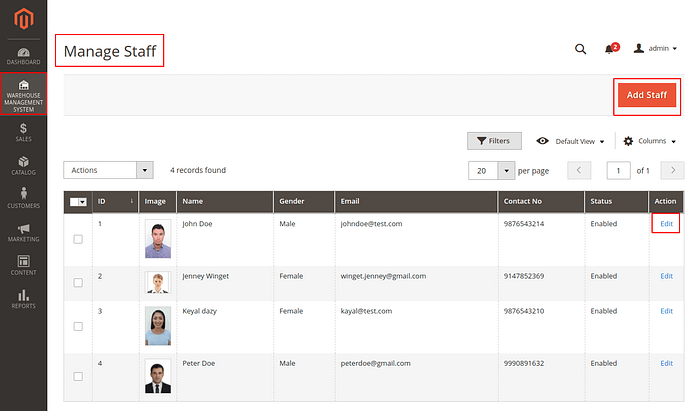
The admin can change the status of the existing staff as Enabled or Disabled. Also, they can delete or edit the details of the existing staff.
For the creation of the new staff, the admin needs to click on the Add staff button.
After that, the admin can create new staff by entering some required fields to create the staff as per the below image:
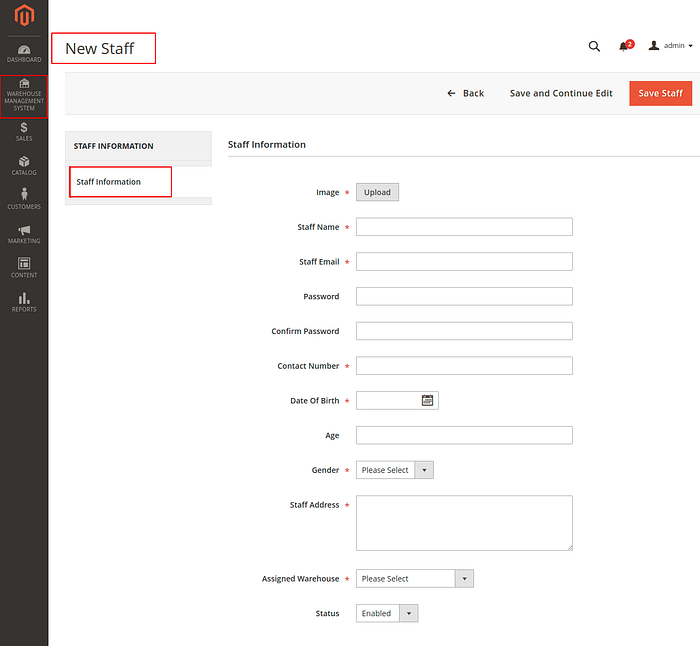
Staff Information:
The admin needs to enter the staff information such as; the Name, Email, Contact Number, Date Of Birth, Age, and Gender. The admin also has to upload the image of the staff.
Password — The Password for the staff to log in to the WMS app will be created by the admin from here.
Confirm Password — The admin has to confirm the entered password.
Staff Address — The address of the staff can be updated by the admin.
Assigned Warehouse — From here, the admin will assign the staff to a warehouse.
Status — The admin can decide whether to enable or disable the status of the staff.
Thus, after entering all the details, the admin can click on the Save Staff button for saving the staff.
After saving the staff, the staff member will receive the email with credentials like this:

Order Management
Once a new order is placed the admin can navigate to Sales> Orders and open the order to assign it to the warehouse per product.
After selecting the warehouse under the Assign Order tab the admin can select the staff per product.
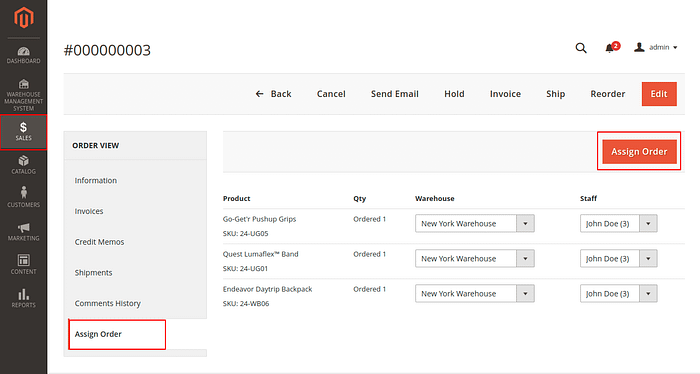
Warehouse: Under this section, the admin can select an available warehouse for that product.
Staff:
Once the warehouse is selected for a product, the admin can select from the available staff in that warehouse.
Also, the orders assigned to the staff are visible.
Once the warehouse and staff are assign to the ordered products, then the admin has to click on the Assign Order button to complete the order assignment procedure.
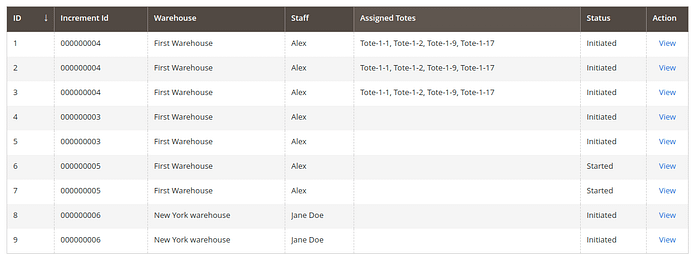
Now admin can navigate to Warehouse Management System > ManageOrders and check the warehouse status of per product per order.
The admin can also see the tote assigned for the product.
Tote Management
Tote consists of removing items from a shelf or box and depositing them in a plastic bin (the products that make up the order will be grouped in that container).
Then, with the help of a conveyor for boxes or carts, the tote is transported to the consolidation area, where workers check that all the products requested by the customer are there. Lastly, the products are pack and ship.
The container used in the system is a tote. It’s a plastic box small enough to be picked up by hand and easily moved around the warehouse (generally using conveyors for boxes).
The admin can navigate to Warehouse Management System > Manage Totes. Here, the admin can see all the totes, their warehouse, and barcodes.
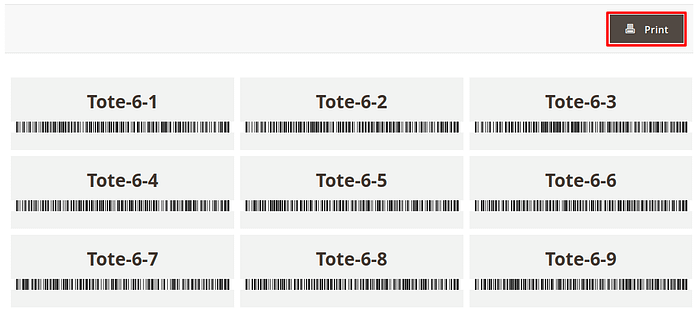
Admin can also print the barcodes of totes one by one or in bulk. The admin needs to select the totes for which the barcode needs to be printed and select action.
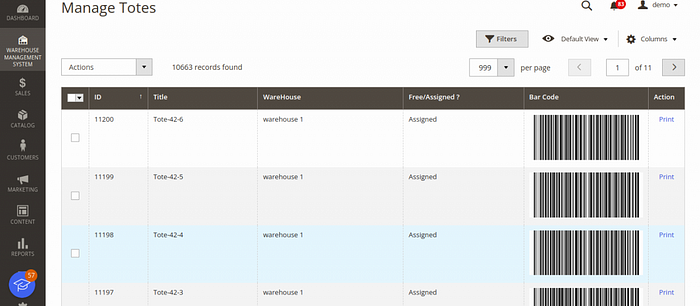
After the placed order comes packed at the app end. Then the Free? The assigned column will show the Assigned status with respectively assigned tote for that particular order.
Now admin will get a new screen where all the barcodes are visible and the admin can print them.
Front-View Of WMS App
The first screen of the app is the splash screen. It will appear to the staff as they open up the app.

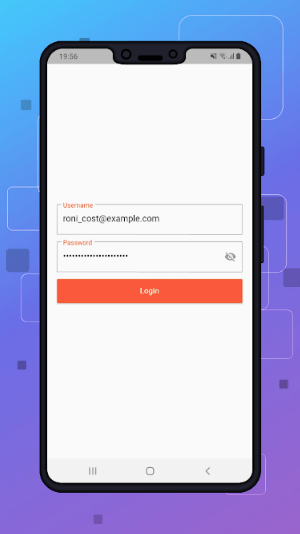
The staff/agent needs to enter their Username and Password which is created by the admin to login to the application.
After the staff logged in to the application, they can see the Order List and Verify Option as per the below image:

The staff of the warehouse will receive a notification whenever a new order is assigned to them.
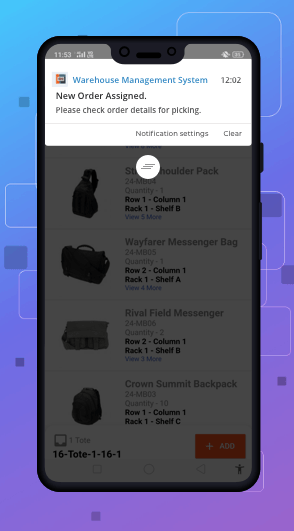
To view all of the orders that are given to them, the staff clicks on the order list button.
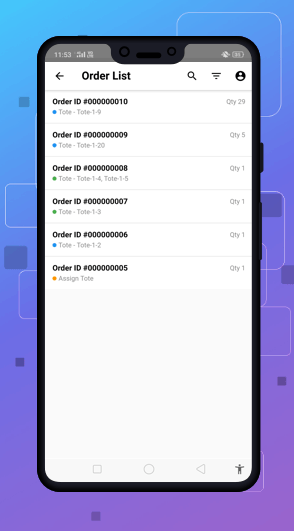
After that, the staff can click on one order to see the products associated with that particular order.
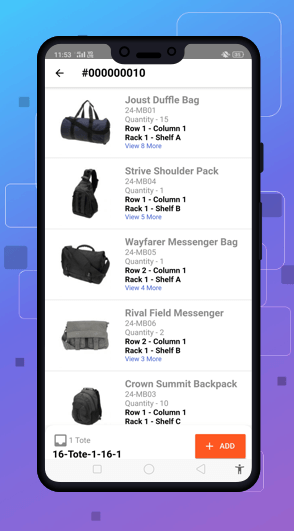
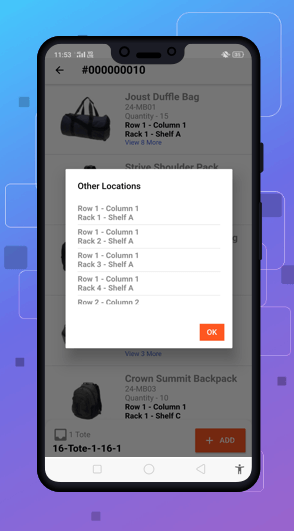
Also, the staff can see the positions of the ordered products so that they can easily navigate towards the products in the warehouse.
Next, the staff needs to scan the tote to associate it with the order and to add the products to it.
The staff can add multiple totes to a single order.
Now the staff starts scanning the products to add them to the tote. They cannot proceed further for the next product without adding the total ordered quantity of the current product into the tote.

Once the staff has done adding all the products associated with the order into the tote, soon the status of the assigned order changes to Picked.
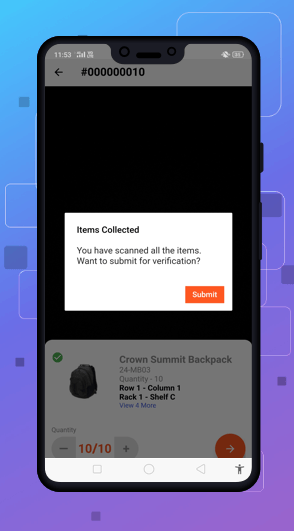
After the staff has add all the products of the order into the tote, they can scan the tote for verification that all the desired products are added to the tote or not.

When the staff scans the tote, it will show all the products associated with the order which are into that tote with the ordered quantity, so that the staff can see and easily verifies the tote.
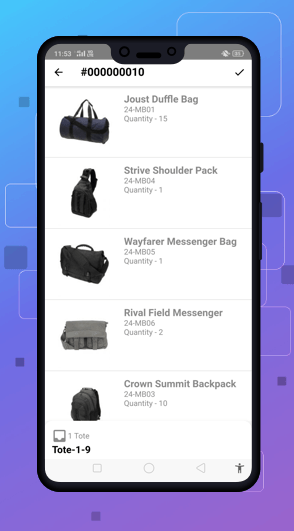
Once the staff verified the tote, the status of the assigned order changes to Packed.
Moreover, this increases the accuracy of pick, pack, and deliver and also decrease the delivery time and order accuracy errors which leads to the easy processing of all the placed orders.
That was all about the Magento 2 Inventory Management softwareMobile App. Moreover, if you have any doubts or queries regarding the extension get back to us at or create a ticket at our HelpDesk system.
Explore the Adobe Commerce Cloud development services by Webkul. Also, other quality Magento 2 extensions.
Current Product Version — 1.0.0
Supported Framework Version — 2.3.x, 2.4.x
Originally published at https://webkul.com on October 7, 2019.
Comments
Post a Comment