With the Magento 2 Web Security module, the admin can provide security services for the Magento store from hackers. The admin can restrict any particular file type to get uploaded on the website and can ban the website for any country and IP address.
Brute force attack notifications to the admin and validation for the customer email address options are also available.
To use this extension the store owner must have the access to the following third parties services:-
- MaxMind’s IP Geo location services – https://www.maxmind.com/en/geolite2/signup
- AbuseIPDB API Plans – https://www.abuseipdb.com/pricing
- MailBoxLayer Services – https://mailboxlayer.com/product
Features
- The Adobe Commerce Web Security module provides admin to enable the unrecognized login notification.
- Master Password feature to block all sub-user accounts.
- Allow admin to get each file upload notification in the system.
- Admin can prevent file types to be upload.
- Ban any country from login into the admin panel.
- Admin can prevent the admin panel from a Brute Force attack.
- Brute force logs available to admin.
- Admin blacklist/whitelist IPs.
- AbuseIPDB integrated to block and report IP.
- Mailboxlayer integrated to validate emails for customers.
- Real-time email validation for customers by admin.
- Create custom email templates for each action.
Install Extension from Webkul Store
#1 Download Module
Firstly, you need to log in to Webkul Store, go to My Account>My Purchased Products section, verify and then download and extract the contents of this zip folder on the system.
#2 Upload Folder
Once the module zip is extracted, follow path src>app and then copy the app folder into the Magento 2 root directory on the server as shown below:

#3 Run Commands
After uploading the module folder, you need to run the following commands in the Adobe Commerce root directory:
composer require geoip2/geoip2:~2.0php bin/magento setup:upgradephp bin/magento setup:di:compilephp bin/magento setup:static-content:deployphp bin/magento indexer:reindexphp bin/magento cache:flush
Install Extension from Adobe Commerce Cloud Marketplace
If you have purchased this extension from the Magento Marketplace then please follow the below process or visit this link.
#1 Get Access Keys
You need to get access keys, navigate to My Profile in Adobe CommerceMarketplace, then choose Access Keys in the My Products section.

Go to Magento 2 and then you need to copy both the Access Keys – Public Key and Private Key. These access keys will be needed in the next steps for authentication.
If access keys are not created earlier, click Create A New Access Key, enter any name and click OK.

#2 Update composer.json File
To know the component name and version number, go to your Adobe Commerce Marketplace account section, My Profile>My Purchases, then find this extension to view the details.
Please note – Below is an example image, every extension will have its unique component name and version.

After that, navigate to your Adobe Commerce Cloud project directory and update your composer.json file in the following format.
composer require <component-name>:<version>
For example, to install version 4.0.0 of this extension you need to run the following command:
composer require webkul/module-application-firewall:5.0.0
#3 Enter Access Keys
Now you will need to enter the Access Keys that you obtained as explained in the first step #1 Get Access Keys. Wait for Composer to finish updating your project dependencies and make sure there aren’t any errors.
#4 Run Command
You need to run the following commands:
composer require geoip2/geoip2:~2.0php bin/magento setup:upgradephp bin/magento setup:di:compilephp bin/magento setup:static-content:deployphp bin/magento indexer:reindexphp bin/magento cache:flush
Multilingual Support
For multilingual support, the admin will navigate through Store->Configuration->General ->Locale Options and select the locale as German (the language into which the admin wants to translate his store content).
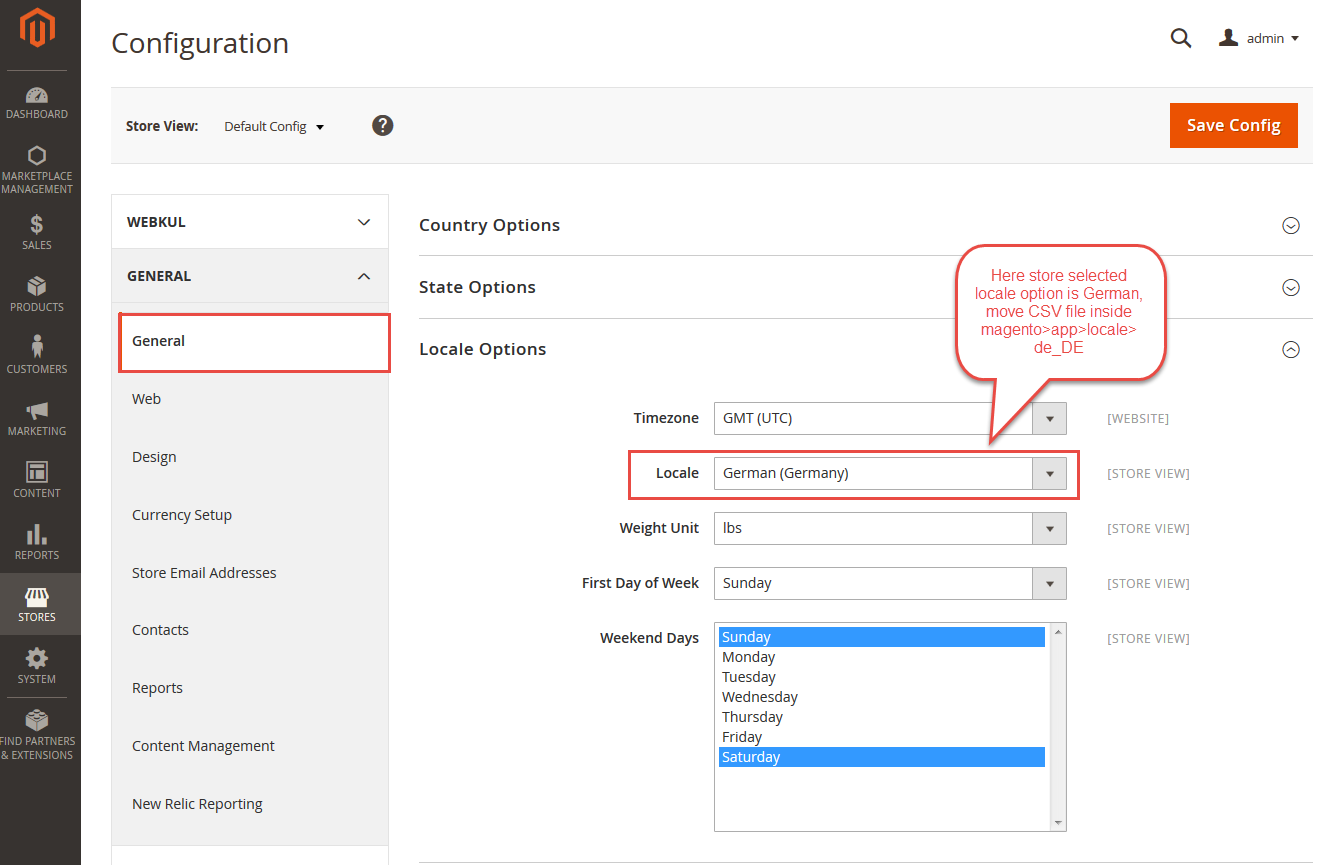
Module Translation
If you want to translate their module language from English to German then follow the path src/app/code/Webkul/WebApplicationFirewall/i18n in their unzipped Magento 2 web security folder. Then you will get a CSV file with the name “en_US.csv”.
Now, rename that CSV as to your region code and language code “de_DE.csv” and translate all right side content in your language.
After editing the CSV, save it and then upload it where you have installed Magento 2 on the server.
The module will get translated into your desired Language.

Admin Configuration
General Setting
The admin needs to configure the following sections as mentioned below to integrate the Adobe Commerce web security into the Adobe Commerce web.
Under the general setting section, the admin will configure the following fields: Enable Adobe Commerce Cloud Security: The admin needs to select “Yes” for enabling the following Adobe Commerce cloud Security.
Get Alerts about Unrecognized Admin Logins: The admin will get alerts each time admin logins through unrecognized means.
Select CMS Page for Blocked IPs: The admin can select the CMS pages to be displayed for IPs which are blocked by the admin.

If the admin selects 404 Not Found as CMS Page to be displayed for the blocked IPs. Then consequently, If the users with blocked IPs will try to sign in they will see the following page as shown:

Send Password Reset Request
If the admin selects this option, all the sub-admin or users will be blocked and will be shared an email with the reset password link.

After that, the sub-admins will receive the following mail as shown below:

Malicious File Security
The admin will be able to enhance the Magento 2 web security of the website from malicious files by configuring the following as mentioned below.
- Get Notification if Any File Uploads by Adobe Commerce: The admin will get the notification for all the files uploaded on the Magento website.
- Prevent Uploading File With Extension(s): Add the extensions that you want to prevent uploading on your website and get a notification for prevented file uploads.
- Receive File Malicious Notification on Email Address: Set the Email Address on which the notification will be shared when the malicious file is uploaded.
- Check Multi Extension: Enable it (set it to ‘Yes’) to check for multiple extensions.

Prevent Uploading File With Extension(s):
Admin/Sub-admin will get a notification for prevented file uploads as depicted below:

Also, the admin will receive a mail regarding this on the registered mail.

Receive File Malicious Notification on Email Address:

Comments
Post a Comment